Spam comments, which mainly come from foreign countries, are becoming a nightmare, especially for larger and more visited websites. Google has therefore developed an excellent means of combating them – reCAPTCHA – available for free to anyone with a Google account.
What is reCAPTCHA and how does it work
Google reCAPTCHA is Google’s system for tracking and evaluating your behaviour on various websites. Based on this, it decides whether you are a real user – a human or a robot. If it marks you as a robot, it is likely that it will not allow you to submit a form (e.g. with a comment or product review), as such a comment may be a source of spam content. If it decides that you are a robot, it will offer you a simple puzzle to solve. If successfully resolved, you will prove that you are human and that your comment is not spam.
How reCAPTCHA works in the background and what algorithms it uses is basically Google’s corporate secret. In practical life, we don’t even have to worry about it, because we can always prove to this tool that we are real people.
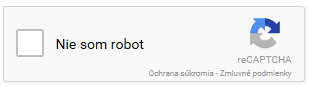
From the perspective of a site user, you have almost certainly already encountered reCAPTCHA. In version 2 it is the famous Google button “I’m not a robot”, in version 3 there is the so-called “I’m not a robot” button. reCAPTCHA Badge. However, it can be set to be in-line. The floating badge is usually displayed in the bottom right corner and often overlaps with the rewind button or the platoon.
 |
 |
 |
| Google reCAPTCHA version 2 | Google reCAPTCHA version 3 – badge | Google reCAPTCHA version 3 – inline |
So when a user ticks the “I’m not a robot” button, Google takes a moment to decide and either confirms the user as a human or throws them a conundrum, e.g. a grid with 9 images and the user has to select the images, e.g. on which there is a traffic light. Very easy for a human, but on the other hand very difficult for a programmed spambot. If you pass the test, you are allowed to submit the form. Version 3 now works completely in the background, so if it weren’t for the reCAPTCHA badge, the user wouldn’t even know that their form had been verified by Google before submission.
How to implement
Google reCATPCHA can be implemented in virtually any HTML form, which means we can use reCAPTCHA on any platform. WordPress, of course, is no exception.
The Google reCATPCHA implementation is a two-step process:
- Creating a Google instance
- implementation on the site
Creating an instance
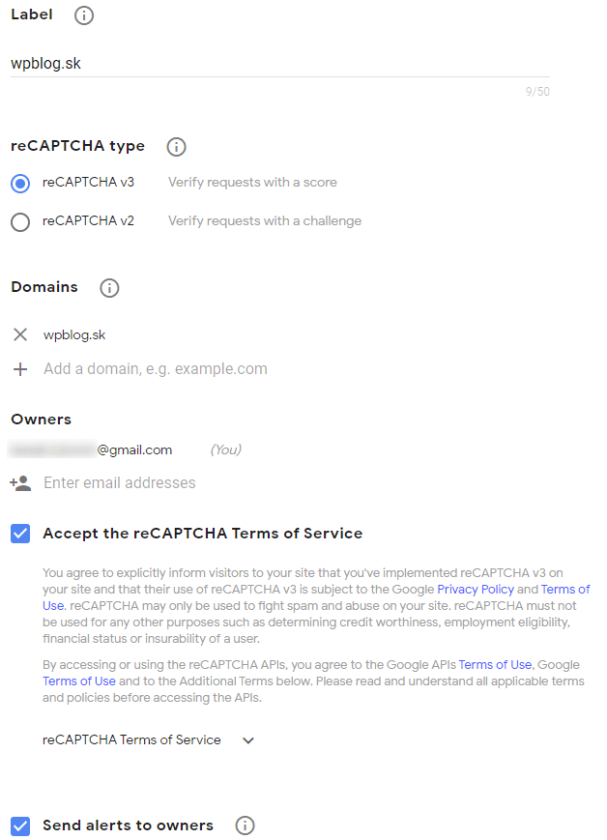
To create a new instance of Google reCAPTCHA, we visit this page and you need to sign in with your Google account. Then fill in the form:
- Label – Instance name: We enter the name of the instance, this is only for our personal use, so that we can find the right instance if needed.
- reCAPTCHA type – Version: reCAPTCHA version. We can choose version 2 (I am not a robot button) or version 3 (badge). I recommend using version 3, which requires no additional action from the user. In addition, it can be set to the so-called. Score Threshold, i.e. a certain sensitivity. The verification system then generates a “score” for each user, which ranges between 0 and 1. The higher the score, the more likely it is to be a real person. So a score of 0 means it is definitely a spambot, while a score of 1 means it is definitely a real person.
- Domains – Domains: a very important part of the whole setup. In this field, we specify the domains for which we want to use this instance. We write domains with the name and domain suffix only, no http://, no https://, no www. and without anything else.
– Correct example: wpblog.sk
– Incorrect examples: www.wpblog.sk | https://wpblog.sk | https://wpblog.sk/rychlostAk we want to use one instance for multiple domains, we simply click on the PLUS icon and add another domain. If you specify a domain name, this instance is applied to all subdomains. So if we specify wpblog.sk instance is also usable on all subdomains, e.g. old.wpblog.sk - Owners: This is where your gmail address is basically displayed. You can add multiple owners for a given instance, they should then see that instance automatically in their account. More suitable for larger development companies where multiple people need to work with a single instance.
- Accept – Accept Terms of Use: As with any other service, you need to confirm your acceptance of Google reCAPTCHA’s terms of use. Without consent, the instance will not be successfully created.
- Send alerts: if we check this checkbox, everyone we have specified in the Owners section will receive an email notification when a new instance is created.
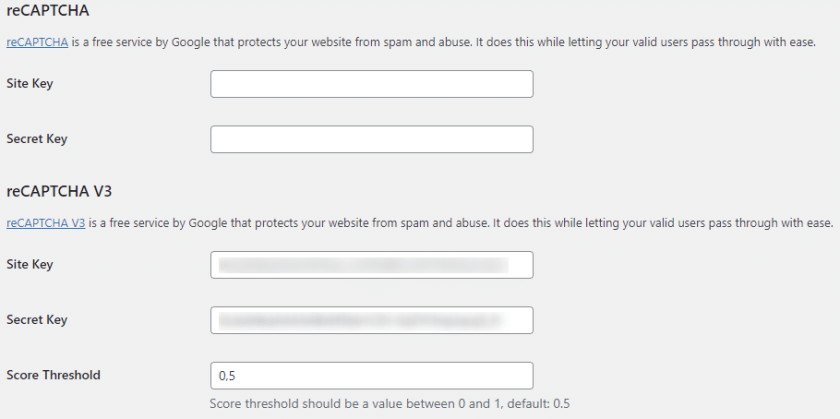
After completing and submitting the form, we will be shown two keys – Site key and Secret key. These are very important for the functionality of reCAPTCHA on the website. So we can copy them. Of course, we can access them again at any time through the reCAPTCHA administration. With this, we have successfully created a new Google reCAPTCHA instance and can use it on the website.
Implementation in Elementor
Elementor Pro has ready functionality for Google reCAPTCHA, you just need to add it and know how to use it properly. First you need to enter the Site key and Secret key. In WP administration, find Elementor / Settings in the left main menu and click on the Integration tab. Right at the top we have reCAPTCHA and below that reCAPTCHA V3, so if we have created an instance for version 3 (recommended), we enter the Site key and Secret key up to the V3 section and leave the reCAPTCHA section blank.
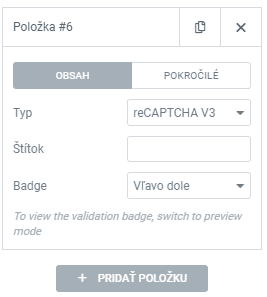
After saving, we still need to apply reCAPTCHA to a specific Elementor form. To do this, open it in Elementor and add a new form field as the last item, it will be of type reCAPTCHA, resp. reCAPTCHA V3. According to our preferences, we choose the type of badge (Badge).
After saving the changes, Google reCAPTCHA will be applied to the form and from now on we are free from spam.