Transparent (or “Naked”) header is a relatively frequently requested element on a web page. One would expect such a banal and desirable thing to be somehow embedded in Elementor, but the opposite is true. There are several ways to make a transparent header in Elementor, but not all of them are easy. I found the most correct solution to be the one presented in this short tutorial.
What we are going to do
First of all, let’s be clear about what we’re going to do and how this header is going to behave. Basically, it is a classic header that has no background and the page content extends beyond it, which in the case of regular headers is located below the header. We will want to ensure that the header remains visible even when scrolling the page. As the lower parts of the page would show through its transparent background the content, which would be graphically beaten e.g. with menu items, we need to ensure that the header has a colored background when scrolling. For example, it will look like this.

We can see that the content of the page, i.e. an illustration video, shines through under the header. After scrolling we will want such a view.

On the Elementora side
On the Elementor side, we need to ensure that the header remains visible at all times. While it is true that you can use Elementor’s built-in functionality to do this, we won’t use it this time. In the line (section) settings -> Advanced -> Motion Effects, leave the sticky property None.

If we used sticky -> Top, we would get what we need, but then we would have to set the margin-top to some minus value on the content under the header, which is not the happiest solution. Otherwise, the content would start below the header, but we want it after the header. So we can achieve the desired functionality with custom CSS code, which we insert in the row (section) settings -> Advanced -> Custom CSS. We’ll use the magic word selector as a CSS selector and set its position not to sticky, but to fixed, and set it to 100% width to ensure that the header reaches the full width of the page. The transition property will ensure that the transition between the colored and transparent backgrounds will not be jerky, but smooth. All specifies that the transition should apply to all properties that change. We could easily write e.g. transition: background 350ms ease;. 350ms means 350 milliseconds, which is the time the animation will take. We can also use decimals, so 350ms is the same as 0.35s (note that we use a decimal point instead of a comma). Ease is the animation type, in this case it is a linear animation.
selector {position: fixed;
transition: all 350ms ease;
width: 100%;
}
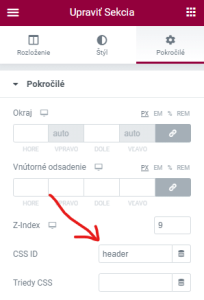
Now we can try scrolling and see that the header always stays there. We just need to set the colour when scrolling. So we’ll go back in the settings line -> Advanced and set the CSS ID, for example, the header. We’ll also remember to set the Z-index. A value of 9 might be sufficient. This will ensure that the header is always on top.
A little javascript
Now it’s time for a bit of javascript. We need to somehow find out what state the scrolling is in and track the change of the scrolling on each scroll. Based on this, we know and need to know if we are completely at the top of the page and then there will be no background, or if we are at least a pixel lower on the page, then we will add a background. Here is the code:
$ = jQuery;
$(document).ready(function() {
$(window).scroll(function() {
var scroll = $(window).scrollTop();
if (scroll >= 1) {
$("#header").addClass("header-scrolled");
} else {
$("#header").removeClass("header-scrolled");
}});
});
What are we trying to do with this code? If we have the document ready, we watch the window object (browser window) and when we scroll, we run our function. We set a number in the scroll variable using the jQuery function scrollTop(). It’s actually the number of pixels from the top of the page. This implies that if we are all the way up on the page, the number will be 0, if we scroll down, the number will always be greater than zero. Well, then we simply check in the condition if the value is greater than or equal to 1, that is, one pixel from the top of the page, in which case we are definitely somewhere lower on the page. We’re going to assign the .header-scrolled class to our #header element (the CSS ID we set above). If the condition is not met, the scroll equals 0, so we’re pretty much at the top of the page, and we remove the .header-scrolled class.
We can simply copy this code into Elementor in the new version of Elementor->Custom code->Add new.

Enter a name and location (Select Header / Head). Remember to wrap this code in the html tags <script> and </script>, otherwise it won’t work. It should look like this:
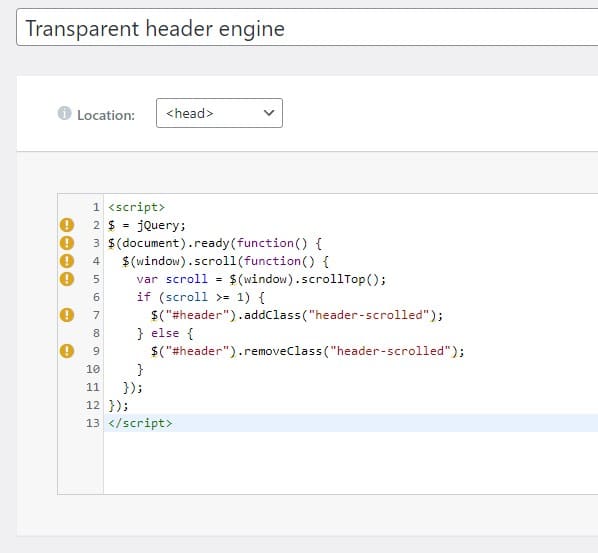
Now when we click on the blue PUBLISH button, a window should pop up asking when to run the code. Since we need this functionality on every single subpage (because we have a header everywhere), we set Entire site.
In older versions of Elementor, where this custom code is not yet available, you need to enter the code in the child-themes.js file.
Changing the background
Let’s go back to Elementor to our header and its own CSS, which we’ll add a little bit based on the resulting class.
#header.header-scrolled {
background: var(--e-global-color-accent);
box-shadow: 0 0 10px rgba(0,0,0,0.15);
}
In the code, we actually set the background and shadow of the header box, assuming it has a .header-scrolled class. It will only have the latter if we are on the page below, this is provided by the javascript above (or its library – jQuery to be precise). If this class is not present, the header will have neither a background nor a shadow. Another interesting thing might be the notation of the color via the var(–e-global-color-accent) variable; it’s actually the notation of the global color, when we change it in the global settings of Elementor, it will automatically change in the header as well. If we used the classic hexadecimal notation, after changing the global color, we would have to manually change the color here in the custom CSS as well. While this isn’t that much of a problem, if we use such lifehacks frequently, it could be quite problematic to find all the places where we’ve typed hexadecimal colors.
And the result? Probably such
Do you know of a better way? Write in the comments.
I have been programming websites since 2006. I have worked in several smaller and larger companies, always as a developer. I know how to program in PHP and lately I have been exclusively working on small and medium-sized projects in WordPress.