In the last article we covered what ACF and CPT are, today we will learn how to work with them. With two plugins we can work with custom fields and post types in a subtle way. Since custom fields and custom post types are two different things that may or may not be related, we will cover them separately in this article.
Article content
- Custom fields and custom post types – an introduction
- Custom fields and custom post types – plugins
- Custom fields and custom post types – view
Custom post types (CPT)
We start with the CPT, because the CPT can then be bound to its own fields. We need to install a plugin called CPT UI. It’s free. After installing and activating the plugin, we will see the CPT UI item in the main sidebar in the admin interface – it used to be in the last place.
Adding a new CPT
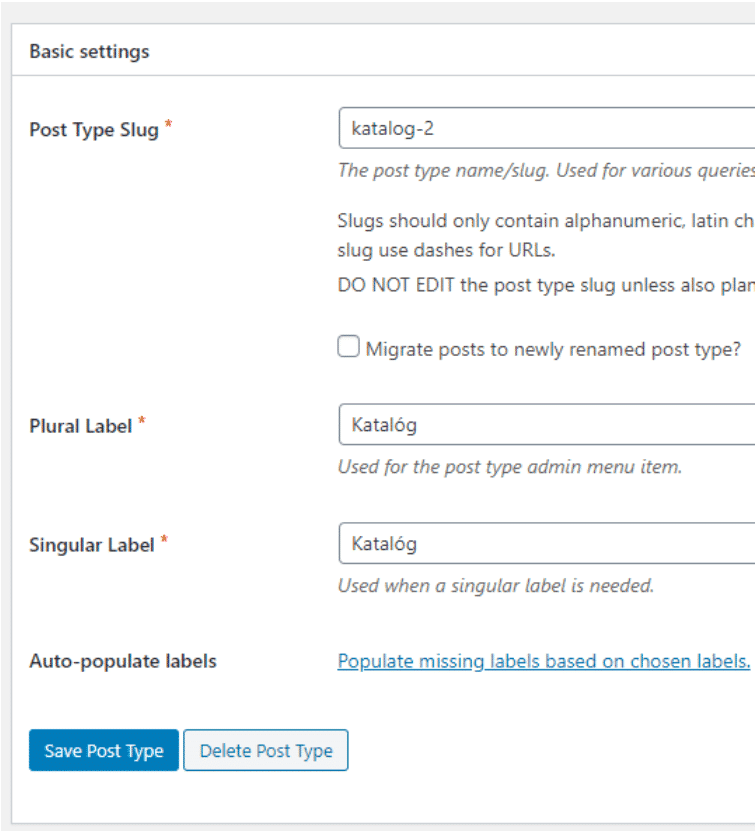 To add a new CPT, click on add/edit post types. We have 4 cards in total at the top , we are interested in the first one that opens. In the top “Basic settings” section, we name our CPT.
I was creating a catalog of projects for the timberframes, so I named the CPT “catalog-2” because the slug “catalog” is already used on the site. Then we enter the plural and singular. Now when we click on the blue “Save Post Type” button, the CPT will be saved and will start appearing in the main sidebar. Unfortunately, we will only have “All entries” and “Add new” available, and the texts will be in English.
In the CPT UI, switch to the second tab “Edit Post Types”. Now this is a bit clumsy- we have a select in which we choose the CPT we currently want to work with. So I’ll choose “Catalogue-2”. If we scroll down, we get to the “Custom labels” section, there we can translate our CPT so that it is displayed in wp-admin in Slovak. Short demonstration:

Then in the bottommost section we have “settings”, i.e. the settings of the CPT. There are many of them, the most important are probably these:
Publicly queryable: specifies whether the CPT can be queried, i.e., in practice, whether the CPT can be worked with within the theme, or whether the CPT is intended only as non-public data that will only be visible in wp-admin, but not on the page.
Delete with user: if a situation were to arise where the user who created the CPT was deleted, whether it should remain or be deleted with the user.
Has archive: specifies whether or not the CPT will have a link to the post archive
Exclude from search: whether this CPT should be displayed in the search results on the page
Hierarchical: Whether a given CPT can have a parent page or not
Menu icon: here we can choose what icon to display in wp-admin in the sidebar, for a given CPT. Dashicons are used here, you need to copy its exact html code.We can find it on the link that is right next to this field.
Supports: here we can specify what all should be used for a given CPT, i.e. whether it should have a title, an editor for writing the main content, an illustration image, comments, whether it should record the author of the post, etc.
Taxonomies: here we select whether the CPT should have categories or tags. ATTENTION, these categories and tags come from the wordpress core, so they are common to all post types – in other words – you will have article categories available here, as well as other CPTs if you have more than one. In most cases we don’t want that (because if we do, then in most cases there is no point in creating a CPT, we can put the content in between articles).
Establishing custom taxonomies for CPT
The second item in the CPT UI is for adding, editing and deleting taxonomies, which are actually categories and tags.
It’s very similar to adding the CPT itself, but in Basic settings we need to check which post types the taxonomy should apply to. This is set in the “attach to post type” section. Again we have the possibility to add different translations (additional labels) for different options. In the “Settings” panel, there is an item called “Hierarchical”. Here, select true for categories and select false for tags.
The difference is that hierarchical taxonomies will be displayed as checkboxes and you can arrange them hierarchically (for example, the music category -> subcategories rock,pop,metal,rap…). Non-hierarchical taxonomies will be displayed as tags, so you will have to search for them in the input and select them.
If we now go back to Add/Edit post types, we will find our newly created taxonomies at the very bottom. Don’t forget to tick them so that they are displayed for that post type.
Working with separate CPT items
So once we have defined our own post type and we can see it in the main sidebar in admin, there is nothing easier than to start adding posts. The procedure is basically the same as in the case of articles. Thus, create/edit an article, and the available options will be the ones we have selected in the CPT settings in the “Supports” section.
In the next article, we’ll show you how to display CPT posts on a page.
Advanced custom fields (ACF)
WordPress already includes custom fields in its core, but they are not very customizable and can basically only contain text, so I recommend installing the Advanced custom fields plugin. It’s a slightly more powerful and transparent custom field manager. The Free version is limited by the fact that not all existing field types are available, in the PRO version all are available, for example the gallery. PRO is of course paid.
 After installing and activating the plugin, we will see the “Custom Fields” item in the main sidebar in the admin. The way arrays always work is that we have to create a group of arrays, even if it’s just a single custom array, it has to be included in the group. We can then “glue” a group of fields to a certain type of posts. So let’s create a new group of fields. We choose an appropriate name for it (in my case “catalog”). In the “Placement” section, select which post types to display the field group for.
As you can see in the attached image, we can add custom fields to posts, to pages, to users, or even to forms. We can condition their display on many properties, such as the type of post or the selected category.
In practical life, if we had e.g. auto parts store, we could set it so that the “Engine spark plugs” group of fields is displayed only for the “Petrol vehicles” category (because diesel engines don’t have spark plugs). We can combine the conditions in different ways.
In my case, I want to create an ACF for a catalog, so I select Post Type | equals | Catalog (this comes from the CPT UI plugin we discussed in the first part of the article).
In the settings section, make sure we have the field group active. We have the option to choose the location of the ACFs, i.e. top (ACFs will be placed just below the title and permalink), normal (ACFs will be placed just below the editor), or side (ACFs will be placed in the sidebar, i.e. where the categories and the illustration image are set).
Now that we’ve made these settings, it’s time to start adding custom fields to the group. We do this by clicking on the blue “Add field” button. This will create and open the first field, where we set the name (from which the slug will be automatically generated) and we need to select the type – that is, what the field should contain, whether it should be a text, or a number, an image, or anything else that is available. For my catalog I created such an ACF:
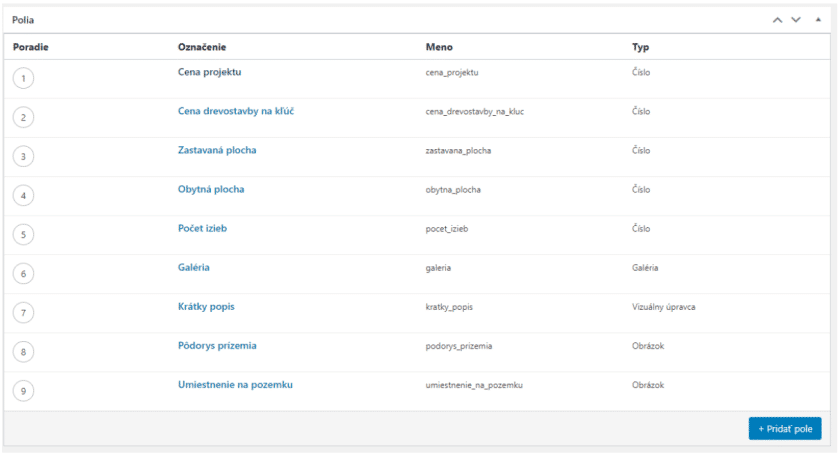
Note: The ACF type called “Visual Editor” is actually a classic wordpress editor. This comes in handy if you need to have multiple options to format your text.
We save our settings by clicking on the blue “publish” button, or any changes by clicking on the “update” button.
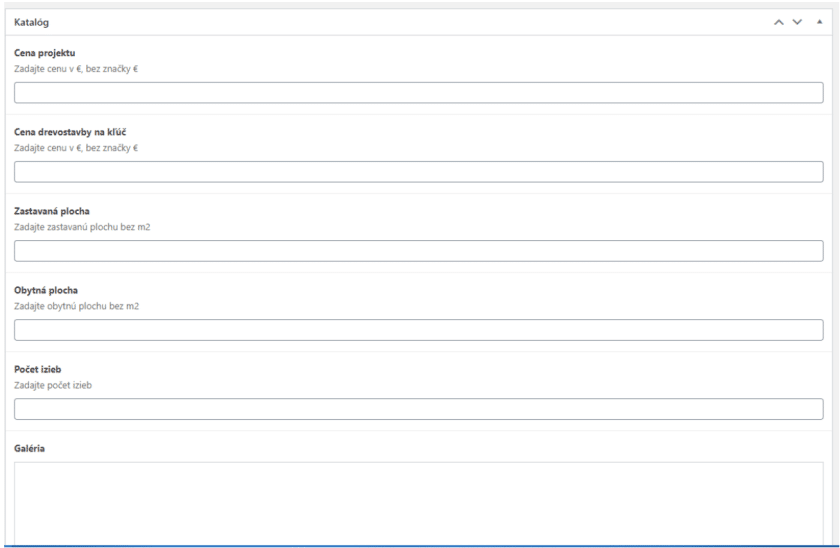
Now when we open the post type and click on “Add New Entry”, we will see these ACFs and we can fill them in.
In a future article, we will show how to display CPT and ACF on a page. Basically it is not that simple, so we use Elementor to display them.
I have been programming websites since 2006. I have worked in several smaller and larger companies, always as a developer. I know how to program in PHP and lately I have been exclusively working on small and medium-sized projects in WordPress.